参考文献
Build web-based plugins for image analysis
简介
在本文中,将制作一个基于Web网页的用于图像分析的ImJoy交互式插件。
使用 HTML/CSS/JS 制作GUI插件
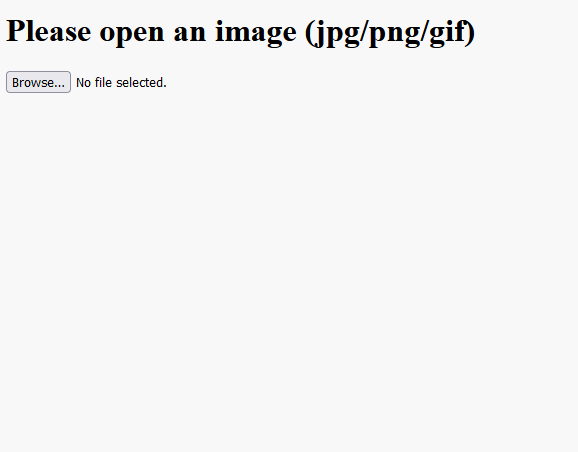
如下插件实现了一个上传并显示图像的功能,具体函数说明详见下面代码的注释:1
2
3
4
5
6
7
8
9
10
11
12
13
14
15
16
17
18
19
20
21
22
23
24
25
26
27
28
29
30
31
32
33
34
35
36
37
38
39
40
41
42
43
44
45
46
47
48
49
50
51
52
53
54
55
56
57
58
59
60
61
62
63
64
65
66
67
68
69
70
71
72
73
74
75
76
77
78
79
80
81
82
83
84
85
86
87
88
89
90
91
92
93
94
95
96
97
98
99
100
101
102
103
104
105
106
107
108
109
110
111
112
113
114
115
116
117
118
119
120
121
122
123
124<!-- 以Json格式定义插件属性 -->
<!-- 名称为Image Viewer,类型为window插件 -->
<config lang="json">
{
"name": "Image Viewer",
"type": "window",
"tags": [],
"ui": "",
"version": "0.1.0",
"cover": "",
"description": "This is a demo plugin for displaying image",
"icon": "extension",
"inputs": null,
"outputs": null,
"api_version": "0.1.8",
"env": "",
"permissions": [],
"requirements": [],
"dependencies": []
}
</config>
<!-- 使用HTML编写窗口的显示内容 -->
<window>
<div>
<!-- 显示文本 -->
<h1>Please open an image (jpg/png/gif)</h1>
<!-- 使用<input>标签定义用户可输入的字段,其中:
type属性定义元素类型,这里为file,即上传文件
accept属性则限制可用文件类型,这里限制文件为图片类型
capture属性则定义在移动设备上可以不上传文件,而是调用系统的相机来拍照
这些属性的用法可以参见如下教程:
https://cloud.tencent.com/developer/article/1537891 -->
<input id="file-input" accept="image/*" capture="camera" type="file"/>
<!-- 使用<canvas>标签来定义一个画布,用于承载图像的显示
canvas元素本身只是一个图像容器,没有绘图能力,需要使用JS脚本进行绘制 -->
<canvas id="input-canvas" style="width: 100%; object-fit: cover;"></canvas>
</div>
</window>
<!-- 使用CSS代码来编写窗口显示内容的样式
这里没有定义特殊样式 -->
<style>
</style>
<!-- 实际插件代码 -->
<script lang="javascript">
// 将base64格式图片传到画布上
// 用法见:https://blog.csdn.net/qq_39765048/article/details/118021098
const drawImage = (canvas, base64Image)=>{
return new Promise((resolve, reject)=>{
const img = new Image()
img.crossOrigin = "anonymous"
img.onload = function(){
const ctx = canvas.getContext("2d");
canvas.width = Math.min(this.width, 512);
canvas.height= Math.min(this.height, parseInt(512*this.height/this.width), 1024);
// draw the img into canvas
ctx.drawImage(this, 0, 0, canvas.width, canvas.height);
resolve(canvas);
}
img.onerror = reject;
img.src = base64Image;
})
}
// 读取文件内容
// 注意这里的形参file,它对应的实参是File对象(由下面的fileInput.files[0]可知)
const readImageFile = (file)=>{
return new Promise((resolve, reject)=>{
const U = window.URL || window.webkitURL;
// 该流程用于safari浏览器
// File对象继承自Blob
if(U.createObjectURL){
// 以下用法就是将Blob用作URL,这样就可以直接访问它
// 用法见:https://zh.javascript.info/blob
resolve(U.createObjectURL(file))
}
// 第二种就是将blob转为了base64编码
// 用法见:https://zh.javascript.info/file
// https://segmentfault.com/a/1190000022208272
else{
const fr = new FileReader();
// when image is loaded, set the src of the image where you want to display it
fr.onload = function(e) {
resolve(e.target.result)
};
fr.onerror = reject
// 转换为 base64 的 data url
fr.readAsDataURL(file);
}
})
}
// 编写插件函数
// 一个最小的插件需要实现两个函数:setup() 和 run()
class ImJoyPlugin{
// setup() 函数:在插件第一次加载和初始化时执行它。
async setup(){
// 通过ID获得页面中的input元素
const fileInput = document.getElementById("file-input");
// 通过ID获得页面中的canvas元素
const canvas = document.getElementById("input-canvas");
// 为input元素添加点击事件,其中涉及了如下语法点:
// (1)addEventListener语法:https://www.runoob.com/jsref/met-document-addeventlistener.html
// (2)箭头函数:https://www.helloworld.net/p/0020086208
// https://gauliang.github.io/blog/2020/javascript-arrow-function-best-practices/
// (3)async/await异步编程:https://www.ruanyifeng.com/blog/2015/05/async.html
// https://developer.mozilla.org/zh-CN/docs/Learn/JavaScript/Asynchronous/Async_await
fileInput.addEventListener("change", async ()=>{
// 执行上面的readImageFile函数
// 输入参数就是input元素获取的文件,具体用法如下:
// https://developer.mozilla.org/en-US/docs/Web/API/FileList
const img = await readImageFile(fileInput.files[0]);
// 执行上面的drawImage函数
await drawImage(canvas, img);
}, true);
await api.log("plugin initialized")
}
// run() 函数:每次执行插件时都会调用。
// 执行时,一个带有上下文(名为“ctx”)的对象object(Javascript插件)或字典dictionary(Python插件)将被传递到函数中。
// 返回的结果将显示为一个新窗口或传递给工作流中的下一个 op。
async run(ctx){
}
}
// 导出插件函数,或称注册插件函数,
// 这是为了使得插件可以被ImJoy主程序或其他插件所调用
api.export(new ImJoyPlugin())
</script>
插件的运行结果如下图:
更改
对上述插件做一点更改,来加深对它的理解。具体地,增加一个上传按钮<button>,它将触发打开文件对话框,以便可以使用该按钮来选择文件。 (这样做原因是为了后面可以轻松自定义按钮的外观。)
(1)在<input>标签下方,添加一行:<button id="select-button">Open an image</button>
(2)在setup函数中,添加:1
2
3
4
5
6// 当按钮点击时触发文件上传框
const selectButton = document.getElementById("select-button");
selectButton.addEventListener("click", async ()=>{
// 模拟对<input>标签的点击
fileInput.click()
}, true);
(3)在<style>块中添加一个css样式来隐藏<input>元素:1
2
3#file-input{
display: none;
}
(4)另外,可以通过添加更多css来更改标题文本的样式:1
2
3h1{
color: pink;
}
现在插件变成了如下模样:
使用css库
手工制作CSS样式非常耗时,需要深入了解UI设计原理和CSS本身。
幸运的是,已经有很多UI库(Bootstrap, https://materializecss.com/ 等)可以利用。还有更强大的js库和框架可以构建更专业的UI,例如:React、Vuejs和Angular。在本教程中,将选择一个名为 Bulma 的小型CSS进行说明。
通过查看Bulma的文档这里,可以看出,只需要加载一个CSS文件。
在ImJoy插件中,加载第三方CSS或Javascript库的方式是将url添加到<config>块中的requirements字段。
因此增加如下代码:1
2
3{
"requirements": ["https://cdn.jsdelivr.net/npm/[email protected]/css/bulma.min.css"],
}
Bulma支持大量不同的元素和布局,可以在此处阅读有关按钮的信息。
基本上,只需要向按钮标签添加一个类(例如class="button is-primary"),它就会改变它的外观。同样,也可以在 <h1> 标题中添加 class="title"。
即修改如下代码:1
2<h1 class="title">Please Open an image (jpg/png/gif)</h1>
<button id="select-button" class="button is-primary">Open an image</button>
现在插件变成了如下模样:
进一步地,可以尝试使用panel将 button 和 <canvas> 分组。
要在Bulma中使用图标,需要添加 https://use.fontawesome.com/releases/v5.14.0/js/all.js 和 requirements。然后从这里搜索图标。例如,如果找到一个名为 eye 的图标,可以使用将该图标作为 <i class="fas fa-eye"></i> 添加到html中。
在相应的地方修改代码如下:1
2
3
4
5
6
7
8
9
10
11
12
13
14
15
16
17
18
19"requirements": ["https://cdn.jsdelivr.net/npm/[email protected]/css/bulma.min.css", "https://use.fontawesome.com/releases/v5.14.0/js/all.js"]
<window>
<div>
<input id="file-input" accept="image/*" capture="camera" type="file"/>
<nav class="panel">
<p class="panel-heading">
<i class="fas fa-eye" aria-hidden="true"></i> My Image Viewer
</p>
<div class="panel-block">
<button id="select-button" class="button is-link is-outlined is-fullwidth">
Open an image
</button>
</div>
<div class="panel-block">
<canvas id="input-canvas" style="width: 100%; object-fit: cover;"></canvas>
</div>
</div>
</window>
现在插件变成了如下模样:
使用图像处理库OpenCV.js
OpenCV是一个常用的计算机视觉库,用C++编写,现在它已经用WebAssembly编译,可以在浏览器中运行。
opencv.js有很多功能介绍文档,但对于本教程,以下两部分就足够了:
(1)了解如何使用opencv.js加载和保存图片,阅读这里
(2)从此列表 中选择一个图像处理教程并将其集成到图像查看器插件中。例如,图像阈值、平滑图像、canny 边缘检测或分水岭分割。
基本上,需要经过三个步骤来实现:
(1)在<config>下的"requirements"中添加opencv.js库"https://docs.opencv.org/master/opencv.js"
(2)从教程中取出图像处理部分,并将其包装为一个函数(例如processImage)
(3)添加点击时调用函数的button。
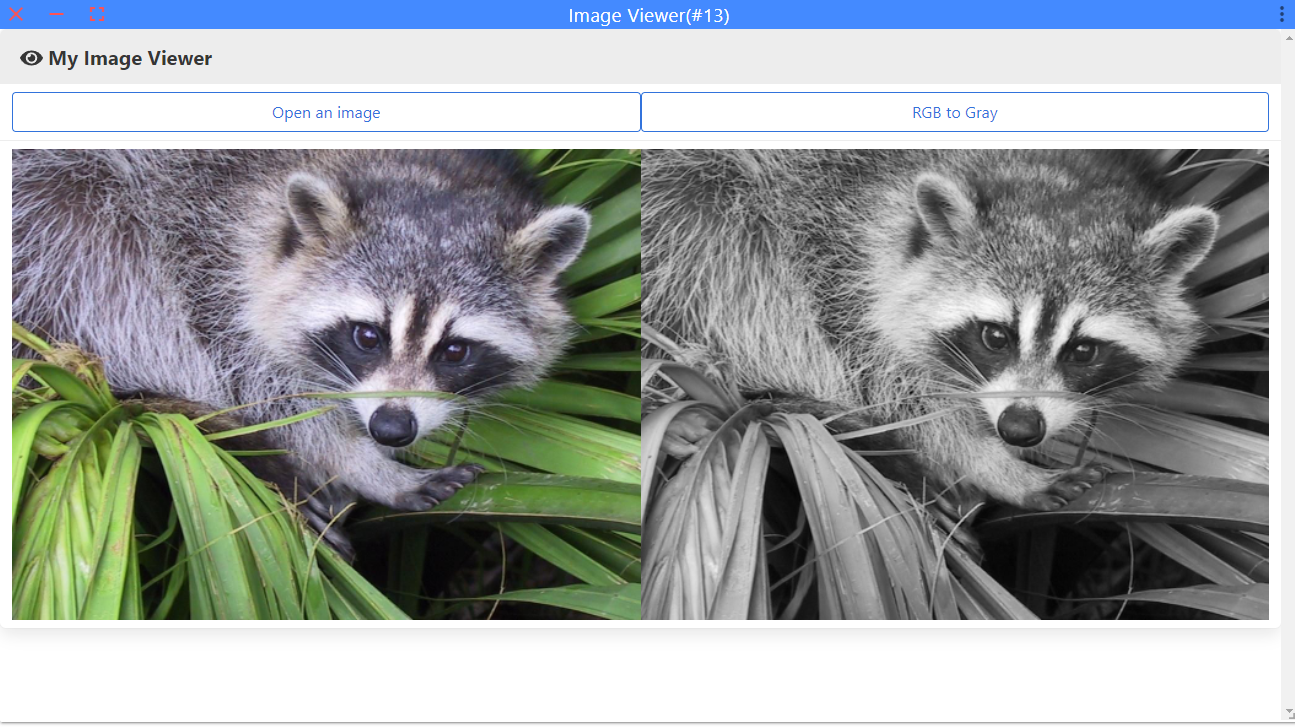
接下来以“彩色转灰度”这一功能作为例子:
(1)添加opencv.js库:1
"requirements": ["https://cdn.jsdelivr.net/npm/[email protected]/css/bulma.min.css", "https://use.fontawesome.com/releases/v5.14.0/js/all.js", "https://docs.opencv.org/master/opencv.js"]
(2)编写图像处理函数:1
2
3
4
5
6
7
8
9
10
11
12
13
14
15<div class="panel-block">
<canvas id="input-canvas" style="width: 100%; object-fit: cover;"></canvas>
// 新增一个画布,用于显示处理后的图像
<canvas id="output-canvas" style="width: 100%; object-fit: cover;"></canvas>
</div>
// opencv图像处理函数
function processImage(inputCanvasId, outputCanvasId){
let src = cv.imread(inputCanvasId);
let dst = new cv.Mat();
cv.cvtColor(src, dst, cv.COLOR_RGBA2GRAY);
cv.imshow(outputCanvasId, dst);
src.delete();
dst.delete();
}
(3) 添加事件:1
2
3
4
5
6
7
8
9
10
11
12
13
14
15<div class="panel-block">
<button id="select-button" class="button is-link is-outlined is-fullwidth">
Open an image
</button>
// 新增一个按钮来触发图像处理操作
<button id="process-button" class="button is-link is-outlined is-fullwidth">
RGB to Gray
</button>
</div>
// 在setup函数种新增如下事件
const processButton = document.getElementById("process-button");
processButton.addEventListener("click", async ()=>{
processImage('input-canvas', 'output-canvas')
}, true);
整个插件的运行示例如下:
使用深度学习库tensorflow.js
Tensorflow是一个被广泛使用的深度学习库,它已经被移植到javascript在浏览器中运行,该库被称为Tensorflow.js。
这一部分会将Tensorflow.js集成到上述插件中,具体功能为使用一个预训练的MobileNet算法对图像进行分类,详见这里。
(1)首先引用必要的JS库:1
2
3
4"requirements": [
"https://cdn.jsdelivr.net/npm/@tensorflow/[email protected]",
"https://cdn.jsdelivr.net/npm/@tensorflow-models/[email protected]"
]
(2)增加预测按钮、结果显示、模型加载等窗口组件:1
2
3
4
5
6
7
8
9
10
11
12<div class="panel-block">
<button id="predict-button" class="button is-link is-outlined is-fullwidth">
Predict
</button>
</div>
<!–– Header bar ––>
<div class="hero hero-sm bg-secondary">
<div class="mx-2">
<h3 id="hero_title"></h3>
<p id="status"></p>
</div>
</div>
(3)在setup函数中增加事件响应:1
2
3
4
5
6
7
8
9
10
11
12
13
14const predictButton = document.getElementById("predict-button");
predictButton.onclick = ()=>{
this.predict()
}
// Load the model.
const statusElement = document.getElementById("status");
statusElement.innerHTML = 'Loading pretrained model...';
this.model = await mobilenet.load();
document.getElementById("hero_title").innerHTML = 'Model loaded'
statusElement.innerHTML = '1. Open image (.png/.jpg) or use pre-loaded image. <br> 2. Click `Predict` for image recognition!';
// Display the predict button and file selection
predictButton.style.display = "inline";
fileInput.style.display = "inline";
可以看出,分别为预测按钮绑定了点击事件响应,以及自动下载模型。
(4)编写模型预测逻辑:
在上面的预测按钮点击后,会触发如下预测函数(这个函数在setup之外,即与setup地位平齐):1
2
3
4
5
6
7
8
9
10
11
12
13
14
15
16async predict(){
const canvas = document.getElementById('input-canvas');
// Classify the image.
const predictions = await this.model.classify(canvas)
// Output result in console
console.log('Predictions', predictions);
// Output results in interface
document.getElementById("hero_title").innerHTML = 'Predictions: '
const result_string_html = `Top-1: ${predictions[0].className} (${Math.round(predictions[0].probability*100)}%) <br> Top-2: ${predictions[1].className} (${Math.round(predictions[1].probability*100)}%)`;
document.getElementById("status").innerHTML = result_string_html
// Output results as ImJoy alert
const result_string = `Predictions: Top-1 ${predictions[0].className} (${Math.round(predictions[0].probability*100)}%); Top-2 ${predictions[1].className} (${Math.round(predictions[1].probability*100)}%);`;
api.alert(result_string)
}
增加上述内容后,整个插件运行结果如下:
可以看出,在最下面对图像中的内容进行了分类识别。
注意:虽然基于浏览器的插件已经很有用,并且随着WebAssembly和WebGPU等新技术的使用而变得更加强大,但它无法进行大规模计算,并且由于其安全性而受到许多限制。